
I have really enjoyed learning lighting and feel that I have come a long way. It has been a problem with getting it to work in scenes and constantly tweaking it every time we render but the outcome is most rewarding. I feel that Nathan and I have worked really well together and achieved the desired effect.
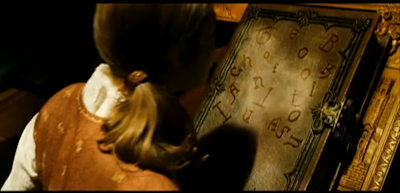
Lighting: I wanted stars outside to give the scene realism and depth I think the scene looks much better. Also Nath included the flame that he edited in photoshop and added as an image plane. Unfortunately the reflection in the Grandfather clock does not show the candle and highlight glow of light. Never the less this shot is really nice. 

Here are some of the lighting tests using my candle light and Nathans lighting. Some of Nathans. The candle light gave a warm glow and highlighted shadows as intended. Some of the shots the fog was quite intense and had to be dropped down. Also the candle flame was not showing up in the scene just the glow. It's a shame as it took such a long time to achieve this effect and get the candle to flicker. Please see earlier tests of what the flame should look like. I like the fog in this shot although in later shots you can see more of the glow from the candle hitting the surface and hands highlighting the librarian.
 This shot the candle lights glow have been lowered the reflection in the eyes give a hint of the glow. It should be a warm glow on the left from the candle.
  This shot the glow from the candle is apparent and Nathans fog. Gives it a nice warm feel.
 The warm lights from the candle give a nice glow to the left of the face whilst the right is in darkness with the touch of Nathans lighting. This gives a warm glow highlighting shadow. I like the lighting for this shot.
 This shot the owl is in darkness with a soft glow from the Nathans evening lighting from outside and warm glow of the candle. I would like a little more lighting in shot just to emphasize depth.
  Lighting really nice in this shot my candle light along with Naths lighting gives good shadow effect.
 Warm glow from the candle ....


 Running out of time with this I just wanted to experiment with this kind of fog lighting as I wanted strong shadow. The edge of the light is to crisp and the glow of the doves need to be adjusted....for now its fine. I've been playing around with the fog density using spot light changing angle and penumbra...adding fog to the light. 'lightfogSE' which has a volume material associated with it. A linear effect gives the soft look.


 This is the kind of effect I would like to achieve for the final shot when the librarian is falling shot. Nathan has done the lighting for this shot which I am very pleased with. I just wanted to experiment with creating this kind of look however this is not yet finished as I want the doves to glow and want some dust particles that show in the light.
  I love the purple glow in this shot and the elongated shadow created from the chair as the light hits it...gosh so much to play with lighting tweaking then rendering so cool when you acheive the look you want....
As I said previously this is only touching the surface....Once the particles have been created I used lights mentioned below to achieve the glow....There are a couple of things that need to be tweaked.
- flame glow in the reflection of the glass in frame
- Light moving according to the flame...haven't tried this yet but it may be possible to parent the light to the particle or animate the light or to adjust when doing the render passes....This has taken some time to complete and I am happy with the results apart from the above that will need to sorted for the final animation.
- Correct shadows to move with the flicker of the candle flame.
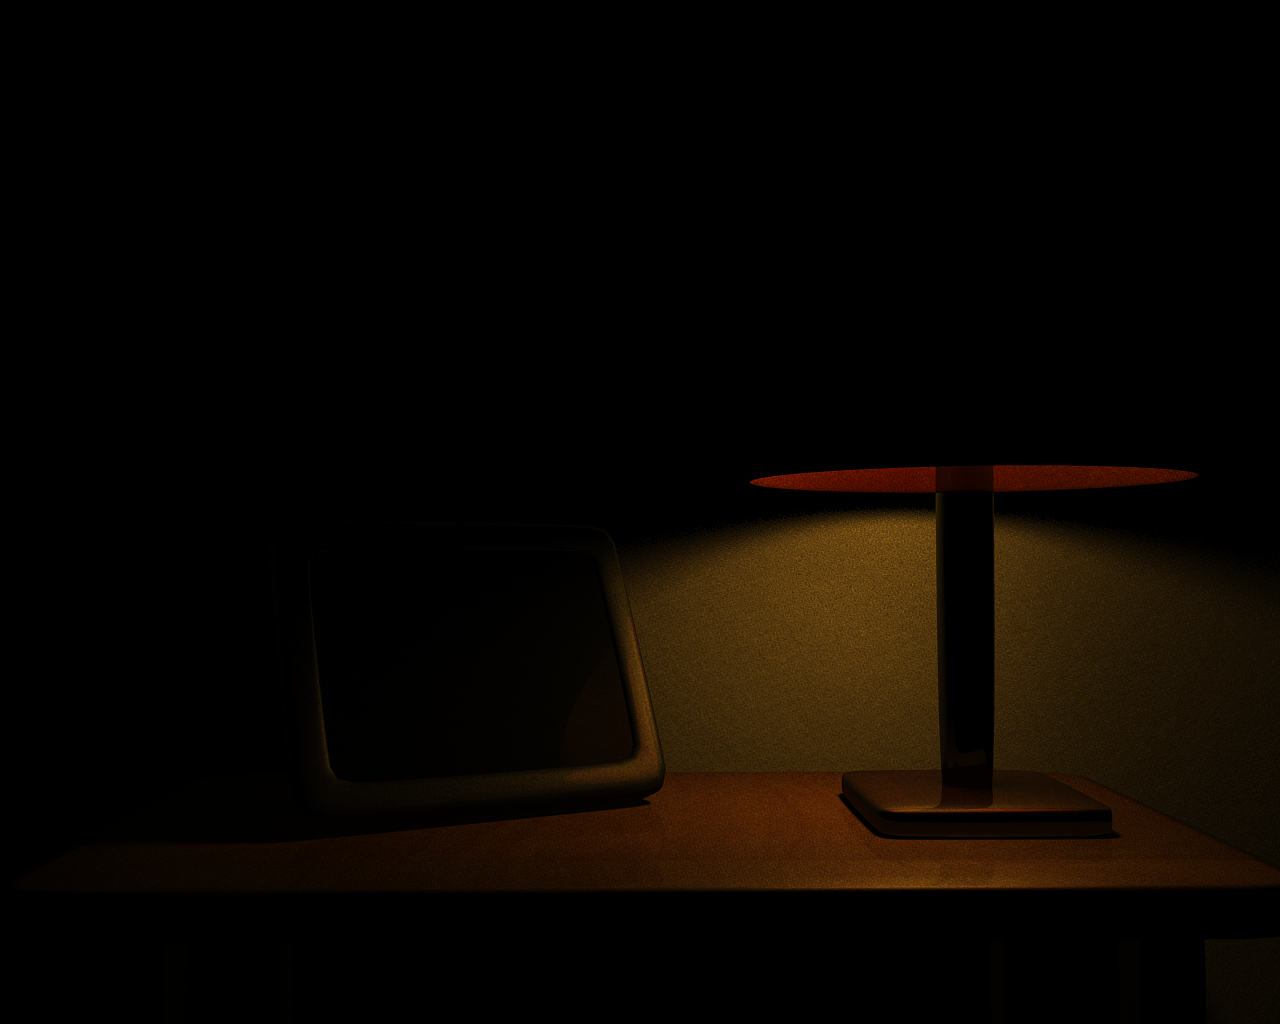
This is a test of the candle put in to the lamp stand scene I created to experiment with the lighting effect...Maya kept playing up so was a frustrating experience. Never the less I am happy with the results so far.......
 Just checking in the original file all the components to creating the flame.
 Just to make sure the hierarchy is the same in the scene file of leap_of faith. As you can see a fluid emitter was used.

Ok ...now spending some time as shown below creating a candle type glow. Lets face it I've only just touched on the surface as particles was used with emitters to get the effect I wanted to achieve a real type fire glow that moves. This is the first stage....However when importing the the candle into the scene the fire seems to not work but just has an outline. I checked to see if the emitters were in the right folder and they were.


Candle lighting experiments...will write a bit later been working on the dynamics of candle again as the flame didn't seem to work in the scene.


 Using depth map rather then ray tracing gave a better look...just need to work on shadows and candle. The dynamics working but the flame effect does not seem to be working...not good as it took such a long time getting the flame right...


LIGHTING EXPERIMENTS
Below I have created a scene to experiment the kind of lighting I wish for leap of faith just in case the candle doesn't work. In this tutorial I would like to explore UV mapping and texturing and lighting effects.
 Final Look...really like this the glow is the kind of effect I wish to achieve for leap of Faith. Shadow rays increased so shadow was sharper.

Making the inside brighter by duplication the inside faces... by adding a different texture to lamp. I used a Lambert and adjusted colour to white. Increased incandescent to brighten the area.


 in Rendering menu - light only to effect lamppost lamp base and table top. in the lighting shader to light linking editor...so only the tabletop and the post and base were expanded/selected.
  Directional light used to brighten the table and base.
 Selected colour and adjusted the translucence. so was slightly darker. Adjusted translucence focus down so it is more spread out.
 Lamp shade often are thicker top and bottom or has a ribbon instead of adjusting it within the geometry i adjusted the translucence. Using the ramp by adjusting colour. as shown above. Interpolation selected to none.
  Translucence increased to make the lampshade look like a bulb is behind it.
 I really like the softness of the glow...
 Lamp light was selected and duplicated one has shadow and another does not have shadows. so everything ended up to bright so the intensity was adjusted on both.

 in Shadows raytrace shadows was selected. light radius increased to .5 and shadow rays increased.
 I really like this effect but is still not the desired effect...needs more light...
 Adjusting decay rate to the desired brightness.
 point light used for lamp and changed colour to a yellowy orangy colour...saturation knocked back around half way. Adjusted intensity and moved the light so that it shines at the top.
  Desired effect reflective knocked back.
 adjusted....still too much reflection.
 first render reflectivity to strong....so knocked down reflectivity...
 Switching off filter type.

 All textures applied to objects. and switched off the filter type in shader mode to allow the textures to come out sharp.
 Just opened resolution gate to show what is going to view when rendering. I bookmarked the position with camera.
  The wall was changed as the bump was to heavy. by selecting the input toggle and adjusting in hypershade and selecting wall texture and reduced the bump depth to desired effect.
 used the input output connections by selecting a node and viewing the path in the work area.
 Applying textures using outliner.
 Shaders applied. with the frame the reflectivity was knocked back and the glass the transferred was brought down and specular colour.
  Same process was applied to all objects. The textures that have been saved a file was created to select each texture.
 The fractel was attached to the bump by middle mouse button and used default option.
 By selecting each shader - wall a bump map was used by selecting general utilities and selecting bump 2d node. a fractel was selected for bump.
 Creating shaders with the outliner. wall - lambert renaming it to the object. Table - Blinn. Lampshade - lambert. lampost - blinn. Picture lambert. etc....

Had a problem with some of the uvs so I selected each point and moved it individually.


 By applying same formula to the table top instead of repeating each sequence again I transferred attributes changed to local. select lamp base shift select table then transferred attributes...
The following was repeated for leg posts as well. Delete history breaks the link so the items are seperated.
 the squares for ends is not really important as it wont be seen. Generally same sequence applied by moving uvs to shell and move and sew tool. By using scale tool to adjust the texture to suit plane.
 Sorting out uvs by selecting uv to shell and moving the planes and sewing the edges.
 The direction of the uvs follow the pattern of texture.


 Wall in planer mapping with right axis selected.
 lamp shade - cylindrical mapping
lamp post - automatic mapping in uv editor toggle shaded uv display to show uv. blue ok and red shows the uv flipped which can be corrected by selecting flip uvs...
glass planner mapping
Frame automatic mapping.
 U V Mapping organised each individual with separate layer after assigning type of UV mapping.
 Assigning checkerboard pattern shader....


 U V Mapping organised each individual with separate layer after assigning type of UV mapping.
 Assigning checkerboard pattern shader....

-----------------------------------------------------------------------------------------------------------------


 Shadow using directional light. I wanted the light to bounce off the frame and cast shadow over books.
 I used an area light to create light and can be used for global illumination and protons. This was a bit of a nightmare as I wasn't pleased with the original look. I place the light outside the frame even with adjusting intensity it did not look realistic so i placed it inside until I got the right look. I didn't want intense light but warm dull light. I did this by reducing the size and illumination.


 This is the look placing the area light inside. Much nicer...as I wanted it quite low lit enhancing shadow...film noir style.
 I quite like this look that will benefit from candle light.

 Added point lights for candles as a quick example although immiters have been used for flame effect. Generally with the lighting i messed around with the settings to get what I switched on shadows and ray tracing.


 Getting close to what I want... Still a little to clean...with textures will look pretty cool.

 I selected the directional light - window - relationship editor - light linking - light centric - select the light and the plane to deselect. This is a fantastic way to light individual objects within the scene, for example a person in the room.


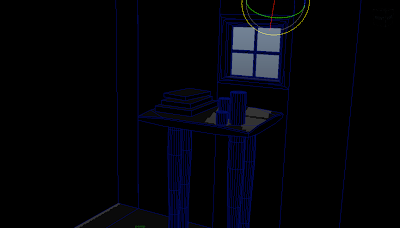
 I created four spot lights and created a plane. The lights aim at the centre of the scene.
 I went into shading mode5 and lighting 7. or selected in viewport use all lights. In the renderer I changed to Hogh quality rendering.
 Spot lights with no colour.
 played around with the settings penumbera angle and cone angle to 20 with drop off.
 Cone angle...
 penumbra angle...

 Changed colours


 a cylinder created interesting to find the depth with the cone angles...


 All lights selected...
 Ray trace shadows on....
 I sed the chanel box to select more then one object.

 Used more objects to show depth and interaction with each other....
 can only use lights 8 times so I duplicated the 4 lights making 8.


This section I will be looking at lighting for objects and film noir type lighting effects. This is for the piece where the librarian falls and the light falls across hers eyes as she falls into the distance.


Lighting Experiments. -
Inspiration...Chronicles of Narnia - Voyage of the Dawn Treader...
After watching The voyage of the Dawn Treader - I got quite excited as this is the kind of lighting that i want for the inside of the room. Dark and moody heavily lit with evening sunlight through the window and emphasising on shadow. Gold and majestic looking yet old and atmospheric. I suggested to Nathan to watch it as he will be doing the lighting.


Experimenting with lighting....
During the course of this learning outcome it was decided that Nathan concentrate in the lighting and I to concentrate on the concepts and animatics as well as the other pieces submitted for Dans section. This has by no means been a waste of time. I really enjoyed lighting and wish to develop my skills in this field.
I decided to continue learning lighting skills by following online tutorals as well as books. This is not an area that i am well skilled and for Dans work I really wanted to try out new things....
As discussed I modelled a room to try some lighting experiments...The room is to be warmly lit with candles and evening light.
Source:
http://www.youtube.com/watch?v=vFceo0uozXU&feature=relatedhttp://www.youtube.com/watch?v=vFceo0uozXU&feature=related
I modelled a simple room.
I created a directional light and placed outside the window. I used directional light as its good to use for outside light day or evenng.
I switched ray tracing on...


 Shadow using directional light. I wanted the light to bounce off the frame and cast shadow over books.
 I used an area light to create light and can be used for global illumination and protons. This was a bit of a nightmare as I wasn't pleased with the original look. I place the light outside the frame even with adjusting intensity it did not look realistic so i placed it inside until I got the right look. I didn't want intense light but warm dull light. I did this by reducing the size and illumination.

 This is the look placing the area light inside. Much nicer...as I wanted it quite low lit enhancing shadow...film noir style.
 I quite like this look that will benefit from candle light.
 Added point lights for candles as a quick example although immiters have been used for flame effect. Generally with the lighting i messed around with the settings to get what I switched on shadows and ray tracing.

 Getting close to what I want... Still a little to clean...with textures will look pretty cool.
 I selected the directional light - window - relationship editor - light linking - light centric - select the light and the plane to deselect. This is a fantastic way to light individual objects within the scene, for example a person in the room.
The outside needs a warm evening glow. Candles need to be lit with candleflame effect.
I had problems with my mac so I had to do the whole thing on my PC.....eventually eventually I managed to sort out my maya on my mac.....


----------------------------------------------------------------------------------------------------------
Trying out some lighting techniques using realtime shadows in Maya. for the inside of the room. This is hardware dependant according to the video card.
Source: http://www.youtube.com/watch?v=NSGa0f-FeqY
 I created four spot lights and created a plane. The lights aim at the centre of the scene.
 I went into shading mode5 and lighting 7. or selected in viewport use all lights. In the renderer I changed to Hogh quality rendering.
  Spot lights with no colour.
 played around with the settings penumbera angle and cone angle to 20 with drop off.
 Cone angle...
 penumbra angle...
 Changed colours


 a cylinder created interesting to find the depth with the cone angles...


 All lights selected...
 Ray trace shadows on....
 I sed the chanel box to select more then one object.
The Shadows were enabled by selecting in lighting...

 Used more objects to show depth and interaction with each other....
 can only use lights 8 times so I duplicated the 4 lights making 8.


This section I will be looking at lighting for objects and film noir type lighting effects. This is for the piece where the librarian falls and the light falls across hers eyes as she falls into the distance.
I was paying more attention to the objects opposed to the environment.
Film Noir examples


In this section I will be developing my lighting and texturing of a glass bottle. I will be concentrating on the different types of lighting and lighting that has a more atmospheric moody tone to an object. Lighting in particular that will be used to highlight the expression of the eyes - film noir style.
Bottle
Just created a quick bottle by using the CV curve tool and revolving it....
Just trying some shaders in Maya - Mental Ray- to get a glass look...Used a blin shader then adjusted the decreased the colour, increased the transparency, ambient colour, incodescdnt, diffuse and in the specular shadings increased specular roll off, and colour and decreased the refraction.
In the retrace option changed the refractive index to 1.56
In the Attribute Editor - render changed the ray tracing by maximising trace, refractions and reflections.
Will be using some utility nodes to - colour to finesse the look...but for now this will do then I will take it into the dynamics folder and try out some shatter effects.
This is a very time consuming to get the right look. I really want the glass to be dark but for now this is fine.


Learning...
- Different lights - Ambient, directional,point, spot, area, volume
- short cuts, Views,
- Spot light attributes - Cone angle, Penumbra, colour, intensity, illuminates by default, emit diffuse, decay rate, Drop off,
- Barn door
- Intensity Curves.

Are you looking for free Twitter Followers?
ReplyDeleteDid you know you can get them ON AUTOPILOT AND TOTALLY FOR FREE by getting an account on Like 4 Like?