


For this section I will...
- Model and animate a candle that flickers
- Model and animator an open book with turning pages
- Model a bottle and texture and smash from a height.
I will be modelling a simple candle and for this section I will be experimenting with secondary animation with the candle flame.
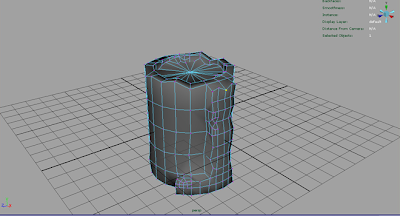
I firstly created a candle by using a poly cylinder and adding geometry by using the cut faces tool. I began to shape the candle by extruding faces.


Deleted by type and history...


Resource for modeling candle: www.videojug.com/webvideo/how-to-make-a-basic-candle-in-maya
www.cgsutra.com/autodesk_maya_tutorials/m0001_candle_flames
To create the flame in the demo below I used the How to create an awesome fire effect using maya fluids in cg tuts. By Alan Monroig. I am pleased with the result. http://cg.tutsplus.com/tutorials/autodesk-maya/how-to-create-an-awesome-fire-effect-using-maya-fluids/
The Flame....
Interesting to find in my research Alex Alvarez tutorial and tips of candleflame suggests staring at a candle flame and looking at what it does. He clearly states that what becomes evidence are some of the behavioural and visual elements which define its appearance. In terms of Maya lingo, a flame looks more like a transparent, incandescent surface than a nebulous object made out of thousands of particles. Flames have feathered yet hard edges, Avery smoothly graduated interior, varying transparency and fluid behaviour more akin to liquid or fabric than gas.
There are many ways of tackling how to animate the flame from soft body geometry which involves rigging the flame and how it renders, Using Maya fluids through a 3D container although controlling the flame can be a somewhat of an arduous task, Using lights and adjusting shaders, or particle illusions or maya fluids. You can use various software such as Houdini and nuke However I simply do not have the time.. I didn't partake in this option as this is more suited if the flame is to be viewed from close proximity. However the tutorial I was looking at involved modeling, soft bodies, goals, springs, fields, lights, hyper shade, render utilities, connection editor and shader glow. Fancy as it sounds I felt I didn't have enough time to master such an advanced method of application but will look at addressing if I have time.
Experimenting with candle flames...
For this section I will be researching candle flames .
The scene is set with ambient candlelight lit with the evening light through the window and the warm glow of the candle.
The candle sits on the lectern where the book also rest whilst the librarian studies under candlelight. I want the candle flame to look realistic and to flicker please see some examples below of candle flames.
I like the glow and the simplicity of the flame moving up and down. However in the animation there is a breeze from the window so I need the candle to flicker.
I've been watching a candle flame studying it's movement it's quite amazing how beautiful it is. The slow melodious meditative ghostly movements quite hypnotic and peaceful...
 Tried a basic technique of creating the flame in photshop and importing into maya to place on plane and key frame. I didn't really like this technique as the flame didn't really look realistic and I had problems with everytime I opened the document. However a good learning outcome of experimenting with different techniques to create the flame.
Using fluids


Test creating a flame in Maya using dynamics fluid effect...changing compositions of emitter and
fluid shape- Container properties, fluid attributes, turbulence,density, velocity, temp,fuel,shading colour, incandescence, opacity etc....took time tweaking to get a realistic look...I will look at creating smoke into the flame to make it even more realistic by using thick cloud puff effect. I am pleased with how it looks so far just need to sort out the lighting so the area of the scene is lit by the glow of the candle....
Dynamics using 3D container with emitter. using the fluid shape2 attribute I changed the resolution to 10 (all three boxes).
Boundary I changed to Y side
Contents method and the temperature to dynamic grid and the velocity to dynamic grid.I then moved the emitter to the bottom of where the flame will originate. I adjusted the frames to suit the type of flame. Under the fluid emitter 1 attribute the heat voxel was changed to 2 and the fuel voxel changed to 4 turbulence was adjusted to 1.150. Changes were made in the fluid shape2 attribute to change the density, velocity and temperature. May I just stressed I had to play around with these options to get the desired effect. I had problems with the size of the flame and it was only when i adjusted the box and increased frames as well as tweaking components that the desired effect took place.
The shading was adjusted - transparency to white grey, drop off shape to sphere, edge drop off to 0.440 and the colour to black.
I then adjusted the incandescence. temp and opacity.
I am very pleased with the result as it was such a pain in the arse to get it to look real...if I could make it look even better but for the purpose of what is needed for the animation it is fine. The next stage will be to create the lighting glow in the environment once Nathan has finished modeling the inside.
Please see below tutorial for the shrek book that I tried.


Above are tests of animated pages turning in a book. For the actual animation the librarian sits perched on the lectern with the bible in front of her. The opening scene has a leaf that falls through the window and passes the book during this process a breeze through the window turns the pages from the book. This will not be a close up but a mid- shot scene so the perfect accuracy of this application is not necessary but rather a tool for learning.
I created a nurb page and increased resolutions from the channel box on the X axis and scaled on the XY axis. Patches were also increased. By selecting drop down menu to animation I was able to add joints to the page. I created 14 joints in all (Insert key) allows to move each joint. I then smoothed skin to the plane. The frames were increased to 400 allowing the animation of the turning pages. In the outliner I expanded the joints and then selected all the joints. In the channel box I created a key. I moved the time line cursor to 100 and selected the first joint then in rotate Z to 180. Assigning a key in rotate Z. This allowed the page to move from one to the other. I then added the movement of the page by adjusting the values and setting keys in the time line.
The pages didn't move properly so I added influence to the edge of the page. This did fix the problem . However, I will need to sort out the binding of the pages so each page doesn't separate like it is doing at the moment.
The pages were increased by using duplicate special. In the outliner all the new joints were expanded and selected. In the time line the keys that were originally set were highlighted. These keys were selected by holding down shift M.M.B. then dragged along next to the first lot. this sequence continued for how many pages were to turn.
Deselecting the joints I selected all the joints in the outliner - deselected planes and pressed H to hide the joints. I guess I could have created a layer to hide them but this was just a short cut.

 I realised that the animation takes place as a flat plane so when modeling the book with the intention to lay the pages that are to turn on top the shape was completely wrong and the joints had already been placed. The left edge of the page kept deforming...I used the painted skin weights...adding influence to the central line. I still had problems so I edited in the graph editor.
Below are images of the process of modeling the book.


 I tried again using joints to turn a page that I had manipulated to the bend of a page. Still had major problems...So I will try non - linear deformers....

Using non linear under animation tab...had a play around with the bend tool....pretty cool tool. Modify edit attribute gives me the tools...attribute editor playing around with the drop down menus. Bend 1....Changing curvature allows to change the curve according to high bound and low bound according to the origin. Envelope is the amount of impact it has with the surface.
I still couldn't get the look I wanted even selecting the handle in different positions. Gonna have to try blend shapes and deform to create the non-linear deformer. Transform bend1handle to the local origin of turning the page. grouped the turn page and bend handle.......
After showing Dan the work (mostly the book then the other stuff) He was concerned that I was spending to long on it. At this stage I would like to underline whilst there are other members of the class that are apt in the field that they chose to work on for Dans project I specifically chose areas that I new I was not good at to develop my technique and understanding. Whilst it might have appeared that I was spending a long time on this issue it was the problem being discussed or perhaps the method of which I was discussing. Perhaps I spent to long showing Dan the book then the other stuff for his project.
Dan suggested that I speak to Alex or Steve. Which I did. Alex suggested inserting a straight rig along the spine of the book or aniamting each node.
I am pleased with the outcome and will consider the following from my research.
- Animate real action book with turning pages using a fan. Close up like the first video used for research.
- Animate the pages turning from front profile so you just view the page turn from a mid-shot.
- Use After Effects
- Maya rig pages as above.
- Book will be lit in candle light with evening pink/orange tone of the evening light through the window
- Animate the book with a breeze coming in from the window and a leaf passing by.
- The book (bible) to be textured with pages of the bible in particular from Proverbs - Before a downfall the heart is haughty my humility comes before honor. This piece of scripture has resonated with me during my walk of faith.
- When lighting to add dust particles to give age and depth to the animation.
- Book to look old and worn out.
- Majestic lighting.

 Created a plane and extruded. Modelled window. Added details by selecting edges and bevelling. Selected vertices and used the chamfer tool to smooth shape. in faces I subdivided thecentre face to foor and bevelled edge by reducing the offset. I turned off keep faces together option and selected the faces off the window and extruded tpo get the for panels. Extruded faces to get the right shape.
 I created a simple curtain using curves. To enable the cloth to have a reaction I added soft bodies to it. SOFT/RIGID BODIES>CREATE SOFT BODY.


No comments:
Post a Comment